Using the Lime Console
When the Lime console is generated, the following window is displayed on the screen:
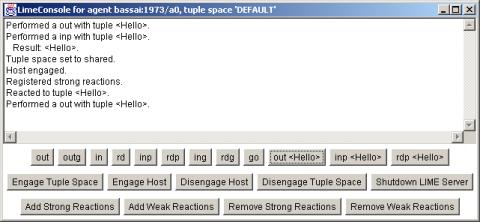
A major portion of the console is occupied by the message area, where brief notifications of the operations performed are displayed. The lower area mirrors most of the operations available on the Lime tuple space associated with the console, namely:
Access operations
outinserts a tuple in the Lime tuple space.outginserts a set of tuples into the Lime tuple space.inwithdraws a tuple from the Lime tuple space, and blocks if no tuple is found.rdreads a tuple from the Lime tuple space, and blocks if no tuple is found.inpwithdraws a tuple from the Lime tuple space, returningnullif the tuple is not found.rdpreads a tuple from the Lime tuple space, returningnullif the tuple is not found.ingRemoves all tuples matching a specific pattern from the Lime tuple space, returningnullif the tuple is not found.rdgreads all matching tuples from the Lime tuple space, returningnullif none are found.gosends a mobile agent to a specified destination, if the agent is a mobileagent (as opposed to a stationary agent).out(Hello)writes a tuple containing the string "Hello" to the tuple space. (useful for debugging)inp(Hello)removes a tuple with the pattern "Hello" from the tuple space, returningnullif none is found. (useful for debugging)rdp(Hello)reads a tuple with the pattern "Hello" from the tuple space, returningnullif none is found. (useful for debugging)
Engagement operations
Engage Tuple Spaceengages the Lime tuple space, i.e., allows sharing with other agents. Note: this, and the next three buttons only work if the engagement mode is set to explicit.Disengage Tuple Spacedisengages the Lime tuple space, i.e., makes it private and prohibits sharing with other agents.Engage Hostengages the host. All misplaced tuples contained in shared tuple spaces will be transferred.Disengage Hostdisengages the host. All the tuple spaces belonging to agents on this host will be no longer visible to the rest of the system.Shutdown Lime Serverstops the LimeServer runtime environment.
Reactive operations
Add Strong Reactionsregisters a set of strong reactions with the Lime tuple space.Add Weak Reactionsregisters a set of weak reactions with the Lime tuple space.Remove Weak Reactionsderegisters a set of weak reactions from the Lime tuple space.Remove Strong Reactionsderegisters a set of strong reactions from the Lime tuple space.
When pressing one of the buttons for an access operation, a dialog similar to the following is displayed:
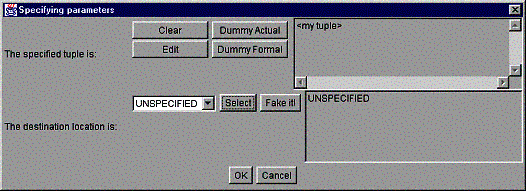
The dialog above is for an out operation. The first portion of
the dialog is concerned with specifying the tuple to be written (or
read/removed). The buttons Dummy Actual and Dummy
Formal are provided as a convenience for testing, and insert the tuples
["Hello"] and [<java.lang.String>] respectively,
where the latter is a template that matches any String.
The Clear button simply clears the contents of the textfield,
while the Edit button allows for editing an arbitrary tuple and
displays the following dialog:

Tuples are created field by field. Only String and
Integer objects are presently supported by the console, and they
can be selected using the first pull-down listbox. The second pull-down
listbox determines whether the field is an actual or a formal, and the
textfield allows for entering the value of the field. Additional fields can be
entered by pressing the More Fields button. Tuple editing is
completed by pressing the OK button, which closes the dialog and
displays the content of the edited tuple in the access operation textfield.
The second portion of the dialog for the out operation above,
is occupied by the specification of the destination locations for the
tuple. The default choice is UNSPECIFIED, which corresponds to
invoking the out(lights.interfaces.ITuple) method without
specifying a location parameter. To accept this choice just press the
Select button and the UNSPECIFIED value will be
displayed as the value of the destination location. However, it is possible to
specify an agent identifier as the destination location in two different ways:
- If the desired agent is currently part of the Lime system, i.e., its
tuple space is shared and its host is engaged, then choose the item
Agentfrom the pull-down listbox and press theSelectbutton. If there is currently only one agent in the system, the identifier of that agent will be automatically displayed in the destination location field. Otherwise, a dialog will be displayed, such as
allowing selection of an agent identifier from the list.
- If the desired agent is not currently present in the Lime system,
you can still output a tuple for it by pressing the
Fake
it!
button. Given the semantics of Lime, this tuple will be a misplaced one. TheFake it!button will display the following dialog
that allows to enter an arbitrary agent identifier. Currently, the format for agent identifiers is the symbolic name of the host where the agent has been created, followed by a colon to indicate the port on which the LimeServer was launched, followed by a slash and the number of the agent (defined as an increasing number for each new additional agent starting with 0) (e.g., swarm:1973/0).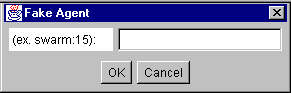
After the operation has been performed, a brief message is displayed in the message area of the console.
Similar dialogs are displayed for the other access operations. The buttons and
choices available are automatically configured according to the semantics of
the operations. Thus, for instance, the in operation has a richer
interface
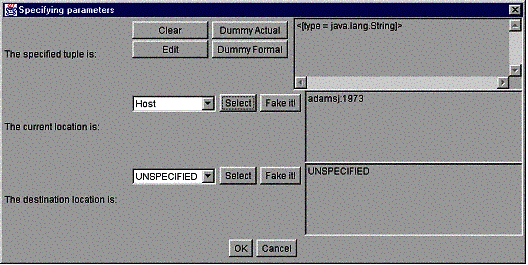
which allows the specification of a destination location where insertion of an
UNSPECIFIED value is automatically prevented. On the other hand,
it is possible to specify a host as the value of the current location, with
steps similar to the selection of an agent described before. Thus, pressing
Select will either automatically insert the field of a host, if
it is the only one present in the system, or display a list of hosts present
in the system. The Fake it! button allows the an agent or host
not present to server as either the current or destination field of the tuple
pattern, based on the value of the drop down box to the left of the Fake
it! button.
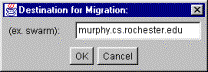
The Lime console also has a go button. This button has no
effect if the agent extends StationaryAgent, however if the agent
is a mobile agent extending MobileAgent, go will send the
interactve agent to the specified LimeServer loacation. The
dialog box accepts a hostname:port specification in the following
interface (note: the default port for a µCode server is 1968):
Engagement operations do not display any additional dialog boxes. They simply cause the corresponding operation to be invoked and then display a brief message in the console.
Reactive operations, on the other hand, display a dialog that is richer
than the one used for access operations. The Add Strong Reactions
button, for instance, displays a dialog that is similar to the following:

This dialog contains the set of reactions that will be registered with the
Lime tuple space. The figure shows one. Of course, initially the list is
empty. Pressing the More button generates the following
additional dialog that allows the specification of one reaction at a time:
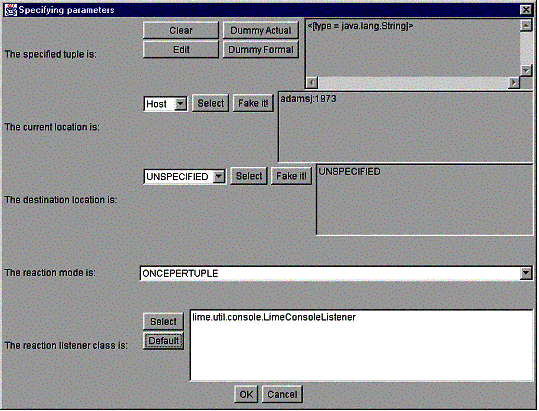
The look and feel of this dialog is similar to the one used for access
operations. However, there is an additional field that allows the specifiation
of the reaction listener that is associated with the reaction. The
lime.util.console package provides a default listener,
lime.util.console.LimeConsoleListener, whose behavior is simply
to display in the message area the message Reacted to followed by
the tuple the listener reacted to. This is the listener that gets selected by
pressing the Default button on the dialog box. However, as
explained in the documentation for LimeConsoleListener, the programmer can define
subclasses of this listener that provide alternative behavior. A specific user
listener can be selected using the file dialog that is displayed when the
Select button is pressed. The .class containing the
bytecode for the listener must be selected.
Similar dialog boxes exist for the installation of weak reactions from
the Add Weak Reaction button. The most notable difference is
that the UNSPECIFIED option is available as a current location
for the pattern.
The Remove Weak/Strong Reaction buttons allow the user to
select from the previously installed reactions the set to be disabled. From
the dialog box on or more reactions can be selected:
